Showing posts with label holidays. Show all posts

Monday, November 19, 2012

Toddler Thanksgiving Puppet

Very self explanatory, very easy and cute for little ones.
Let them paint the turkey as they wish,
remember is not the result that counts with little ones is the process,
then after is dry cut it out or let them cut it out, depends on their age,
glue it to a paper plate that has been attached to a half paper plate
for them to insert their hand and play with it.

Happy Thanksgiving :)


Thursday, December 15, 2011

Christmas Craft

Another cute Christmas Craft and Ornament
with craft sticks is this little Christmas Tree
very simple and easy to make as you can see


you form a triangle with the craft sticks for the tree
and a piece of cardboard for the tree trunk
children can decorate the tree with pom poms
and you can add a piece of ribbon on the back
to hang it as an ornament.

Merry Christmas :)


Sunday, December 11, 2011

Ten Little Reindeer


Ten Little Reindeer

Sung to: "Ten Little Indians"

One little, two little, three little reindeer,
Four little, five little, six little reindeer,
Seven little, eight little, nine little reindeer,
Pulling Santa's sleigh.


Thursday, December 8, 2011

Craft Stick Christmas Ornament

Here's a simple little craft that everyone will love to make and give.


You Need:


• Four Craft Sticks

• One Mini Craft Sticks

• One Large Star Wood shape or a star made out of felt

• Five Small Circle Wood shapes, buttons or felt

• One Medium Square Wood shape or felt

• Green, Red & Yellow Paint

• Red, Green & Gold Glitter

• Tacky Glue

• 6" of Cord

Paint craft sticks and mini craft stick green.
Paint star and square yellow.
Paint circle red.
Let dry.
Glue three of the craft sticks into a triangle.
Glue another craft stick down the middle of the triangle extending below the triangle.
Glue the mini craft stick across the middle of the triangle.
Glue star to the top and square to the bottom where the vertical stick hangs down below the triangle.
Glue on circles. Run a bead of glue all around the tree.
Sprinkle on some green glitter. Shake off extra.
Dab a little glue onto the star and square. Sprinkle on some gold glitter. Shake off extra.
Dab a little glue onto the circles. Sprinkle on some red glitter. Shake off extra.


Glue cord in a loop to the back for a hanger.

And that's it! a cute ornament :)

Hope you like it :)


Saturday, December 3, 2011

Christmas Spelling

This are some Christmas Letter Tile cards that I have in my files,
this is so much fun do in a classroom or
what I do with my daughter is put them in a take along book bag
ready to entertain her on the go :)


I would love to hear from you if you can use them :)

Thursday, December 1, 2011

More Word Walls

Here are more Word Walls for your classroom
or your word book :)


Tuesday, November 29, 2011

Christmas/Winter word walls

Now that December is here
I am going to start putting some Word Walls around the classroom.
But if you are not a teacher
You can use these to make a Winter or Christmas word book.


You should be able to click on the picture and print them full size.
But if you have problems with it,
please let me know. I'll be happy to uploaded a different way.

Enjoy them :)


Saturday, October 22, 2011

Pumpkin Carving Tips - How to Carve a Pumpkin for a Jack-o'-lantern


Pumpkin Carving Tips - How to Carve a Pumpkin for a Jack-o'-lantern


Your jack-o'-lantern can also be an air freshener.

By Peggy Trowbridge Filippone, About.com Guide

Jack-o'-lantern Tips

© 2008 Peggy Trowbridge Filippone

• Do not eat a pumpkin that has been carved as a jack-o'-lantern.

• Choose a large pumpkin1. The larger the pumpkin, the easier it is to carve. Avoid any pumpkins with bruises or moldy stems as they will spoil much faster. Pumpkins with a lighter color tend to be softer and easier to carve.

• When cutting out the top, place the knife at a 45 degree angle so the the lid will have a place to rest when you replace it. If you cut straight down, the lid will fall through.

• When cleaning the pumpkin, save the seeds. Toasted pumpkin seeds2 make a healthy as well as tasty snack. Use a large, heavy metal serving spoon or ice cream scoop to scrape the insides. If you will be lighting the pumpkin, the back wall should be scraped as smooth as possible since this is where the light will be reflected. A 1-inch thickness of the pumpkin wall is optimum.

• For longer life, soak the cleaned pumpkin3 a couple of hours in a bleach water solution of 1 teaspoon bleach to 1 gallon of water. Dry thoroughly, then rub inside and out, including all cut edges, with vegetable oil or petroleum jelly to prevent shriveling. If the pumpkin begins to shrivel, repeat the process. The soaking time will depend upon how dried out the pumpkin has become.

• Beginners should select a simple, bold pattern. Once you master the simple patterns, you can move on to something more difficult.

• Print out or draw the pattern on a piece of paper. Use small sharp scissors or a razor knife to cut out the areas you will be carving into the pumpkin. Tape the template onto the pumpkin and use a marker to trace the carving lines. Cutting slits in the paper will help it to conform to the round surface.

• As an alternative, you can tape the outline to the pumpkin and use a nail or large pushpin to score the carving lines onto the pumpkin. Connect the dots as you carve.

• A long serrated knife or a pumpkin-carving knife with teeth will be necessary to cut through the thick flesh. Use a sawing motion and take your time cutting along the outside edge of the marker lines so there is no marker residue.

• Consider cutting off the bottom of the pumpkin, as well as the top. The pumpkin will be more stable and also easier to carve. If you plan on using a candle to light your jack'o'lantern, be sure the opening in the bottom is large enough to fit over the candle. Place the candle on a fire-proof base large enough to accomodate the pumpkin. You can then easily lift off the jack-o'-lantern to light the candle.

• If you will be lighting your jack-o'-lantern with a candle, be sure to leave the lid off to avoid any fire hazard. Use a votive candle in a glass holder or tea lights in a metal case. If you want to leave the lid on, carve a hole in the unseen back side of the pumpkin to act as a chimney. Never leave a candle-lit jack-o'-lantern unattended for any length of time.

• A small battery-operated flameless candle4 is a safer choice than traditional candles for lighting your jack-o'-lantern.

• Sprinkle the bottom side of the pumpkin5 lid with ground cinnamon6, nutmeg7, and/or cloves to let your jack-o'-lantern do double duty as an air freshener.

• Place the jack-o'-lantern in a plastic bag and refrigerate when not in use.

• Try making an uncarved jack-o'-lantern by painting designs with royal icing. You can enjoy a decorated jack-o'-lantern but still use the pumpkin when Halloween8 has come and gone.


Tuesday, October 18, 2011

Halloween Playdoh Mats

Here are a few Halloween Playdoh Mats
from my files for the little ones

If you click on the image you should be able to print it on regular size paper
but if you have any problems just let me know :)


Make a face on the pumpkin


Copy the vines with playdough


Make a garden for the scarecrow


Make spiders on the web


make owls, bats and even a moon


Have fun!


Thursday, September 1, 2011

Grandparents Day

Here is an idea for Grandparents Day
that we worked on last year
since I couldn't share then,
I figure I share now lol

A pretty cute jewerly box


as you can see we painted the popcicle sticks first,
and the base of the box arethe lids of the waterbottles
that the kids bring to school.
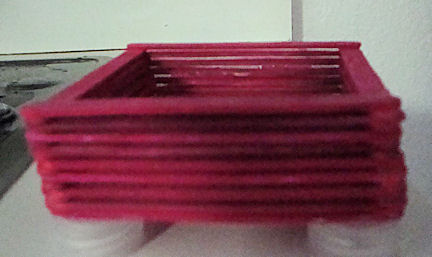
We also made a lid
for the jewerly box
and the same here
the handle is a waterbottle lid


and here you can see our finish product


Very cute!

I think Grandmas and Grandpas
will love these :)

Enjoy!


Saturday, July 2, 2011

4th of July Activities

Sweet Sparklers

Here is a cute activity called Sweet Sparkler
very easy to make, perfect for independance day!

You can also find other 4th of July activities here
like finger puppets
4th of July Finger Puppets.jpg

math activities counting by 10's
359.gif

Independance Day Patterns
tlc10235 Best of Holidays and Seasonal Celebrations 296.jpg

and more :)

Enjoy!


and Happy Independance Day!

 and

Sunday, June 19, 2011

Handmade Father's Day gift


Look at how cute!
This is one of the mugs that my daughter
made for Father's Day.

So proud,
she chose it and she made it
all by herself :)

Just sharing :)

thanks for reading :)